So, I’ve decided to revamp my blog, and rather than going with medium, thought that it’s a bit nicer to use my own site as the content remains under my control and I can use markdown. Github has a good set of documentation on setting up a github page, but as I am using Hugo as the static site generator, there are a few extra things I need to add. These are the steps I used to get it all up and running. Maybe someone will find them useful, if not, they’ll remind me in the future 👼
1. Create a personal github pages repo
Create a new repo with the name <username>.github.io. For now, best to keep the repo empty, otherwise git might complain later when you try to push your local site code to github.
2. Setup Hugo
- If you haven’t got Hugo installed already, install it now. On ubuntu, this is really easy since Hugo is available in the software centre. (or you can do
sudo apt-get hugo). - Next, create a new site with hugo on your local machine with
hugo new site <username>.github.io– this will set up a new folder on your machine with name .github.io (you can use whatever name you want for the folder, but I find it a bit easier to make sure repo names always agree with folder names). - init the folder with git and add the remote as origin (
cd <username>.github.io && git init && git remote add origin git@github.com:<username>/<username>.github.io.git) - add a theme– there’s some to select from https://themes.gohugo.io/. Pick one you like, and install it (e.g.
git submodule add xxxxx) - customize your site config.toml file (there are theme specific stuff options that the theme would have documented, the base hugo ones are here)
3. Setup github actions to automatically deploy your blog
In the top level, add a .github folder and a workflows folder inside – this will store the yaml files that defines tasks github should run when there are updates to the code. Here, I am using two handy github actions: https://github.com/peaceiris/actions-gh-pages and https://github.com/peaceiris/actions-hugo. (there are other interesting things you can do with github actions– more info from the official docs)
My page deploy workflow is as follows
name: hugo publish
# deploy only on publish to main branch
on:
  push:
    branches:
    - main

jobs:
  build-deploy:
    runs-on: ubuntu-20.04
    # check out repo
    steps:
    - uses: actions/checkout@v2
      with:
        submodules: true
        fetch-depth: 0

    - name: Setup Hugo
      uses: peaceiris/actions-hugo@v2
      with:
        hugo-version: 'latest'
    #minify the code for the site
    - name: Build
      run: hugo --minify
    # deploy website code to the gh-pages branch , ie github pages will serve the site from gh-pages branch -- you can specify a different branch for this
    - name: Deploy
      uses: peaceiris/actions-gh-pages@v3
      if: ${{ github.ref == 'refs/heads/main' }}
      with:
        #  you don#t need to define the GITHUB_TOKEN, it's set automatically by github actions
        github_token: ${{ secrets.GITHUB_TOKEN }}
        # the code in ./public is what is pushed to the gh-pages branch
        publish_dir: ./public
        emptyCommits: true
        commitMessage: ${{ github.event.head_commit.message }}
4. Tweak the settings on your repo so the site deploys correctly
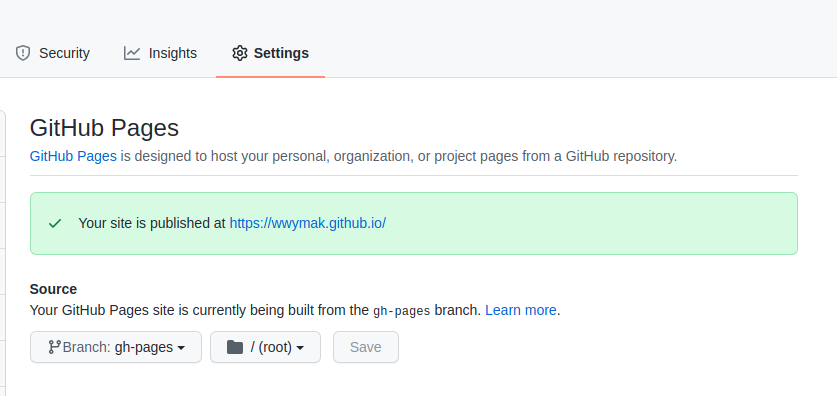
Go to the github pages settings under your repo settings (e.g. https://github.com/<username>/<username>.github.io/settings/pages) and make sure the branch for the site source is correct. (see image below). On the first push the site takes some time to be published. When this is done you’ll see the green tick saying your site is published at xxxx
5. Inspect your site locally
Run hugo server and you should see a local version of your site at http://localhost:1313/ (the cli should tell you the correct localhost port). Now is the time to add customisations as you want. For example, if you find the theme doesn’t suit, you can delete the theme folder and install a new one. You might want also want to add a favicon etc.
6. Push your code to github
Once you’ve push to the main branch, the gh pages actions we set up earlier will run and after < 30mins your blog should be up and running on xxx.github.io 😁
Tips
- to create a new post, use
hugo new blog_post_name.md– this will automatically create the correct file under/contentfor your blog - remember to change checkt the
draft:section in the header– if this is set totruethe default is for Hugo not to render it - if you want to use emojis, you need to set
enableEmoji = truein your hugo config file - for images, you should put them under the
staticfolder, and reference them as - if you want to set up the blog on a custom domain like I’ve done here, there are some additional steps to do on both github and your domain name provider– I will document this in a future post